How to Build a Recommendation System in Python
Recommendation System in Python
Have you ever watched a movie on Netflix, only for the platform to suggest movies of the same genre, starring similar cast members? This is an example of a recommendation system.
Recommendation systems, commonly referred to as recommender systems, are a popular application of data science in marketing.
Companies like Amazon, Netflix, and Spotify use recommendation systems to enhance user experience on their platforms.
These algorithms come up with personalized content suggestions that improve over time as you continue to spend time on the platform.
For instance, notice how music recommendations on Spotify are generic at first. You will initially be recommended the most popular songs on the app since this music appeals to a wide audience.
As you continue listening to music that you enjoy, your recommendations become more accurate.
The user experience can get so personalized that the algorithm will even be able to predict the type of music you will enjoy during different times of the day.
Nowadays, organizations have the ability to track data on a much larger scale than they did just two years ago.
Due to this, recommendation systems can be created on data points collected from millions of users.
This way, not only will you be given recommendations based on your activities on the site, but your profile is also compared with that of other users to predict what you might like.
For example, if you are new to Netflix and only signed up because of three action movies you wanted to watch, the platform will try to get you interested in other genres so that they don’t lose you as a customer.
Browse Categories
You might have received movie recommendations on Netflix that were completely unrelated to the content you usually watch.
This is because the platform’s recommendation system has analyzed your streaming behavior in relation to other users, and is able to predict that you might find a particular show interesting.
Recommendation systems are able to predict your interest in an item even before you are aware of it.
This is a powerful technique employed by service providers and subscription platforms to keep you on the site and prevent you from moving to a competitor’s product.
If you would like to work as an analyst or marketing data scientist at companies like Netflix, Amazon, Uber, and Spotify, it is a good idea to learn how recommender systems work and even build one yourself.
Almost every mid to large-sized organization that sells a variety of services online uses some type of automated system to make product suggestions to customers, and there is a high demand for experts who can oversee this process.
In this article, I will briefly explain the different types of recommendation systems and how they work.
Then, I will walk you through how to build an end-to-end content-based recommendation system in Python.
How to Build a Recommendation System in Python: Table of Contents
- How Do Recommendation Systems Work?
- How to Build a Recommendation System in Python
- Step 1: Prerequisites for Building a Recommendation System in Python
- Step 2: Reading the Dataset
- Step 3: Pre-processing Data to Build the Recommendation System
- Step 4: Building the Recommendation System
- Step 5: Displaying User Recommendations
- How to Build a Recommendation System in Python: Next Steps
How Do Recommendation Systems Work?
Recommendation systems can be created using two techniques - content-based filtering and collaborative filtering.
In this section, you will learn the difference between these methods and how they work:
Content-Based Filtering
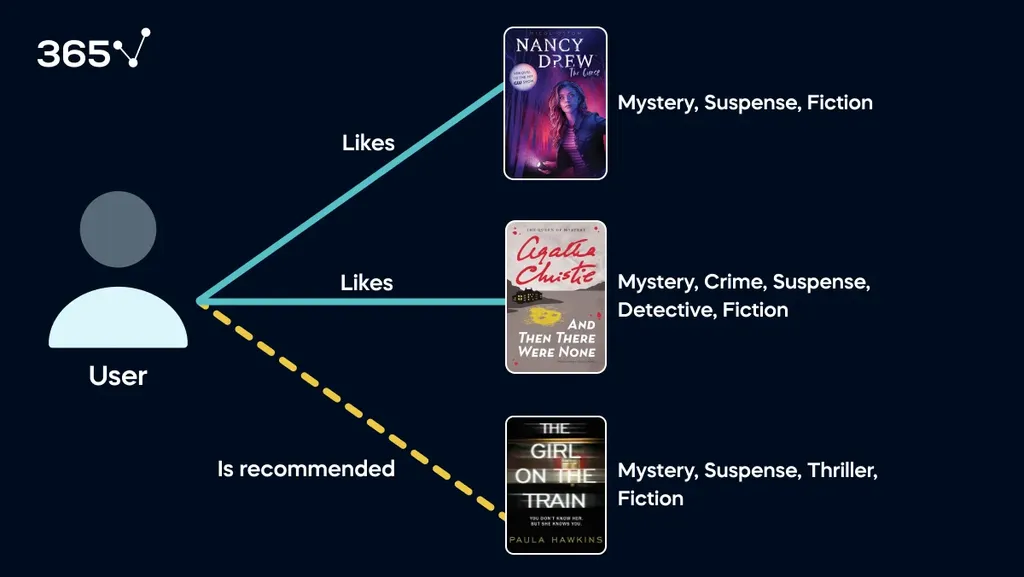
A content-based recommender system provides users with suggestions based on similarity in content. Let’s take a simple example to understand how this algorithm works:
Notice that the user in the image above liked reading a Nancy Drew and an Agatha Christie novel, both of which fall under many of the same categories.
The recommender system then suggests that the user should also read “The Girl on The Train,” since this book is similar to the other items they enjoyed.
Content-based filtering is a simple method of providing recommendations based on a customer’s preferences for particular content.
However, the main disadvantage of this approach is that it will not be able to suggest a product that the user has never seen before.
For instance, the reader above read two crime novels, and the model will never suggest that they read a romance or comedy book.
This means that the user will never get a recommendation outside genres they have already interacted with.
This drawback of content-based recommender systems can be overcome using a technique called collaborative filtering, which will be described in the next section.
Collaborative Filtering
Collaborative filtering is a technique used to generate predictions based on past user behavior.
Unlike content-based recommender systems, collaborative filtering only takes customer preferences into consideration, and does not factor in the content of the item.
There are many types of collaborative filtering but the most common one is user-based.
User-Based Collaborative Filtering
User-based collaborative filtering will create segments of similar customers based on their shared preferences.
Recommendations are provided based on users who are grouped together.
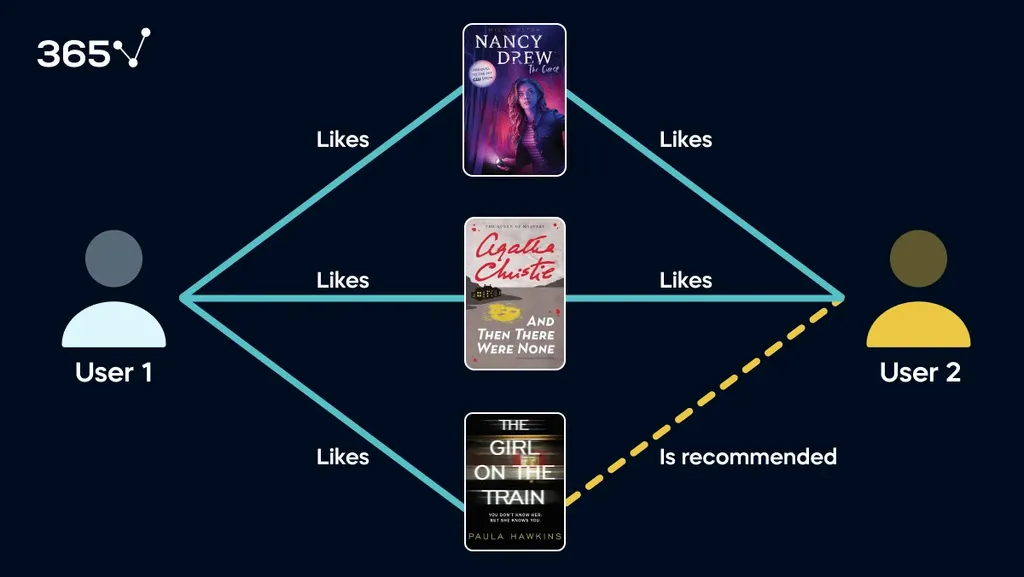
Here is an example that illustrates how user-based collaborative filtering works:
In the diagram above, User 1 and User 2 are grouped together as they have similar reading preferences.
The first user enjoyed reading “The Curse,” “And Then There Were None,” and “The Girl on the Train.”
The second customer liked the first two books but hadn’t read the third one.
Since the algorithm segmented these two customers together, “The Girl on the Train” was recommended to User 2 since User 1 enjoyed it.
User-based recommender systems will recommend products that customers have not yet seen based on the preferences of similar purchasers.
How to Build a Recommendation System in Python?
In the following section, I will show you how to create a book recommender system from scratch in Python using content-based filtering.
Step 1: Prerequisites for Building a Recommendation System in Python
Before you code along to this tutorial, make sure to have a Python IDE installed on your device.
I have used a Jupyter Notebook to build the algorithm, but any code editor of your choice will work.
If you are new to code editors in general, check out our Jupyter Notebook tutorial or Introduction to Jupyter course to get a head start with this highly useful tool.
The dataset we are going to use can be found here. Navigate to the “Download” section of the page and click on a link called “CSV Dump” to download the folder:
After the download is complete, extract the folder to unzip its contents. We will only be using the “BX-Books.csv” file in this tutorial.
Once that is done, install Pandas and Scikit-Learn if you do not already have them.
Step 2: Reading the Dataset
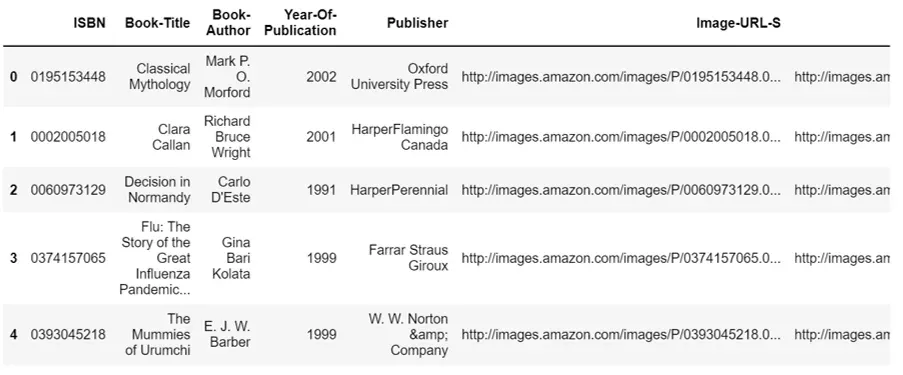
Let’s read the dataframe and take a look at the first few rows using the Pandas library:
import pandas as pd

df = pd.read_csv('BX-Books.csv',error_bad_lines=False,encoding='latin-1',sep=';')
df.head()
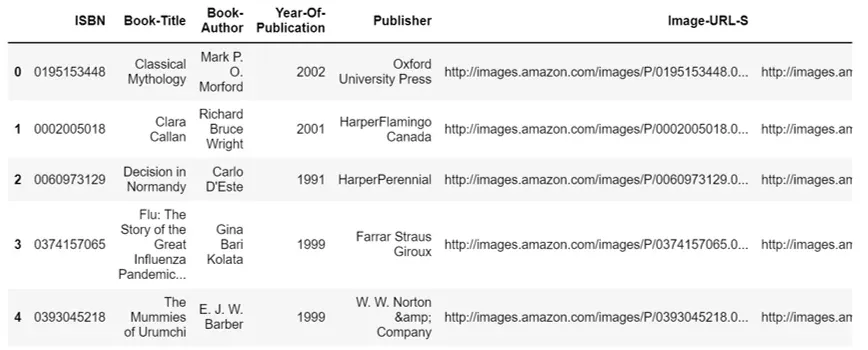
Notice that the dataframe contains information of different books such as its author, publisher, and title. We will use this data to build a recommendation system that suggests what a user should read next based on their current book preferences.
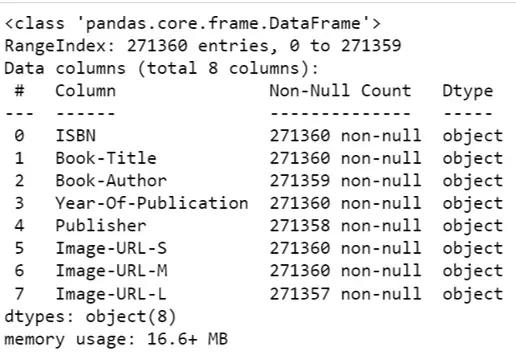
Now, let’s list these variables to better understand them:
df.info()The dataframe above has over 271K rows of data.
We will randomly sample 15,000 rows to build the recommender system, since processing a large amount of data will take up too much memory in the system and cause it to slow down.
Also, we will only use three variables to build this recommender system - “Book Title,” “Book Author,” and “Publisher.”
Step 3: Pre-processing Data to Build the Recommendation System
In this step, we will prepare the data so it can be easily fed into the machine learning model:
1. Removing Duplicates
First, let us check if there are any duplicate book titles. These are redundant to the algorithm and must be removed:
df.duplicated(subset='Book-Title').sum() # 29,225There are 29,225 duplicate book titles in the dataframe. We can eliminate them with the following lines of code:
df = df.drop_duplicates(subset='Book-Title')To confirm that the column no longer contains duplicate values, let’s re-run the above code:
df.duplicated(subset='Book-Title').sum() # 02. Random Sampling
As mentioned in the previous section, we need to randomly sample 15,000 rows from the dataframe to avoid running into memory errors:
sample_size = 15000
df = df.sample(n=sample_size, replace=False, random_state=490)

df = df.reset_index()
df = df.drop('index',axis=1)
3. Processing Text Data
Now, let us print the head of the dataframe again:
df.head()The dataframe contains columns that are not relevant to the model, such as each book’s ISBN code, its year of publication, and a link to its image.
Remember that we will only use the “Book-Title,” “Book-Author,” and “Publisher” columns to build the model.
Since this is text data, we need to transform it into a vector representation.
In simple terms, this means that we will convert text into its numeric representation before we can apply predictive modeling techniques onto it.
In this article, we will create a vector of numbers using Scikit-Learn’s CountVectorizer.
● What is CountVectorizer, and how does it work?
CountVectorizer converts a collection of documents into a vector of word counts. Let us take a simple example to understand how CountVectorizer works:
Here is a sentence we would like to transform into a numeric format: “Anne and James both like to play video games and football.”
The sentence above will be converted into a vector using CountVectorizer. I will present this in a dataframe format, so it is easier to understand:
Notice that a “bag-of-words” is created based on the number of times each word appears in the sentence.
Now, let us add another sentence to the same vectorizer and see what the dataframe will look like.
The new sentence is “Anne likes video games more than James does.”
Observe that more words are added to the vectorizer. As we add more sentences, the dataframe above will become sparse.
This means that it will have more zeros in it than ones, since many sentences will have words that are not present in the others.
The biggest limitation of CountVectorizer is that it solely takes word frequency into account.
This means that even if there are less important words like “and”, “a”, and “the” in the same sentence, these words will be given the same weight as highly important words.
However, CountVectorizer is suitable for building a recommender system in this specific use-case, since we will not be working with complete sentences like in the above example.
We will instead deal with data points like the book’s title, writer, and publisher, and we can treat each word with equal importance.
After converting these variables into a word vector, we will measure the likeness between all of them based on the number of words they have in common.
This will be achieved using a distance measure called cosine similarity, which will be explained below.
● Data Cleaning
Before converting the data into a word vector, we need to clean it. First, let’s remove whitespaces from the “Book-Author” column.
If we do not do this, then CountVectorizer will count the authors’ first and last name as a separate word.
For instance, if one author is named James Clear and another is called James Patterson, the vectorizer will count the word James in both cases, and the recommender system might consider the books as highly similar, even though they are not related at all.
James Clear writes self-help books while James Patterson is known for his mystery novels.
Run the following lines of code to combine the authors’ first and last names:
def clean_text(author):
    result = str(author).lower()
    return(result.replace(' ',''))
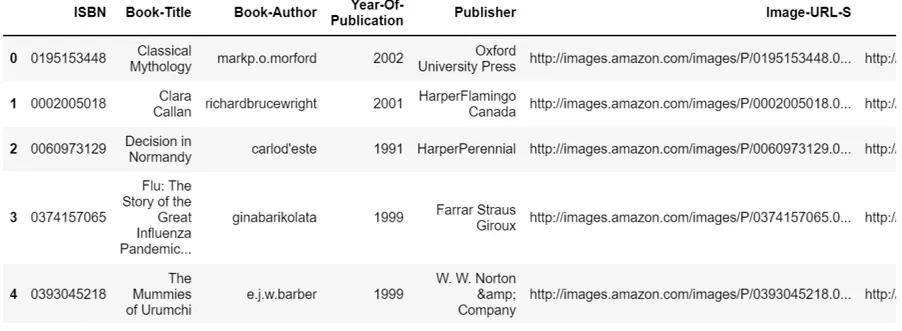
df['Book-Author'] = df['Book-Author'].apply(clean_text)Look at the head of the dataframe again to make sure we have successfully removed spaces from the names:
Now, let’s convert the book title and publisher to lowercase:
df['Book-Title'] = df['Book-Title'].str.lower()
df['Publisher'] = df['Publisher'].str.lower()
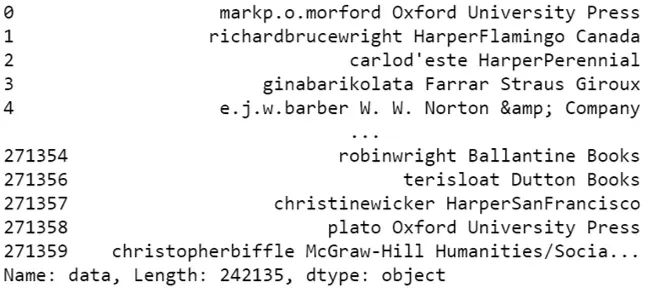
Finally, let’s combine these three columns to create a single variable:
# combine all strings:
df2 = df.drop(['ISBN','Image-URL-S','Image-URL-M','Image-URL-L','Year-Of-Publication'],axis=1)

df2['data'] = df2[df2.columns[1:]].apply(
    lambda x: ' '.join(x.dropna().astype(str)),
    axis=1
)

print(df2['data'].head())
● Vectorize the Dataframe
Finally, we can apply Scikit-Learn’s CountVectorizer() on the combined text data:
from sklearn.feature_extraction.text import CountVectorizer

vectorizer = CountVectorizer()
vectorized = vectorizer.fit_transform(df2['data'])
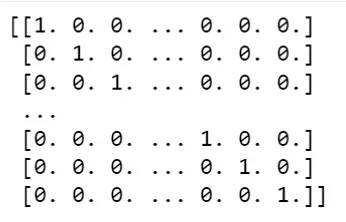
The variable “vectorized” is a sparse matrix with a numeric representation of the strings we extracted.
Step 4: Building the Recommendation System
Now, we will use a distance measure called cosine similarity to find the resemblance between each bag-of-words.
Cosine similarity is a metric that calculates the cosine of the angle between two or more vectors to determine if they are pointing in the same direction.
Cosine similarity ranges between 0 and 1. A value of 0 indicates that the two vectors are not similar at all, while 1 tells us that they are identical.
Run the following lines of code to apply cosine similarity on the vector we created:
from sklearn.metrics.pairwise import cosine_similarity

similarities = cosine_similarity(vectorized)
Now, print the “similarities” variable:
print(similarities)We have a vector of values ranging between 1 and 0, and each vector represents the similarity of one book relative to another.
Since the book titles are not mentioned here, we need to map this vector back to the previous dataframe:
df = pd.DataFrame(similarities, columns=df['Book-Title'], index=df['Book-Title']).reset_index()

df.head()
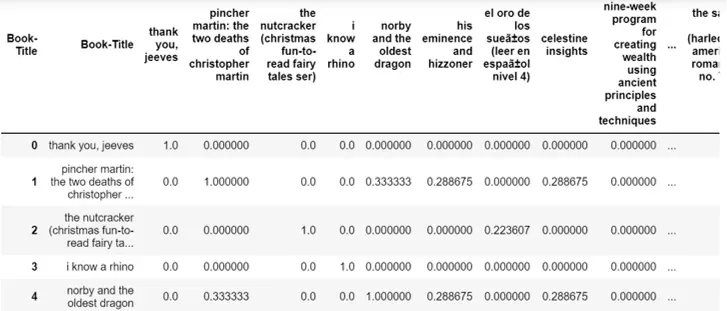
Observe that we have converted the similarity vector into a dataframe with book titles listed vertically and horizontally.
The dataframe values represent the cosine similarity between different books.
Also, notice that the diagonal is always 1.0, since it displays the similarity of each book with itself.
Step 5: Displaying User Recommendations
Finally, let’s use the dataframe above to display book recommendations. If a book is entered as input, the top 10 similar books must be returned.
Let us do this using a book from the Star Trek series as input:
input_book = 'far beyond the stars (star trek deep space nine)'
recommendations = pd.DataFrame(df.nlargest(11,input_book)['Book-Title'])
recommendations = recommendations[recommendations['Book-Title']!=input_book]
print(recommendations)
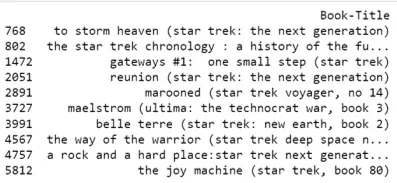
The above code will generate the following output:
Awesome! We have successfully built a recommendation system from scratch with Python.
If you remember, I mentioned previously that the main drawback of content-based filtering was that similar items would be grouped together, and users will not be recommended products with content that they have not previously liked.
Notice that even in this dataframe, we are only being recommended books from the Star Trek series since we used that as input.
To refine the algorithm and ensure that we are not solely recommending products with the same content, a collaborative-filtering based recommender system can be used.
How to Build a Recommendation System in Python: Next Steps
We interact with recommender systems almost every day whether we know it or not.
These models make our lives easier by providing us suggestions on what to eat, wear, and stream.
As the amount of data collected by companies increases, so will the emphasis on using this information to improve user experience.
This application lies at the heart of marketing data science and is one that you should focus on learning if you want to work in the industry.
The goal of marketing data science is to drive business value using data.
Customer behavior is analyzed, and these data points are used to make predictions about how they will act in the future. Other applications of data science in marketing include churn prediction, sentiment analysis, customer segmentation, and market mix modeling.
As a marketing data scientist, it is not sufficient to be an expert at programming and statistics.
You must be able to translate user behavior into actionable insights that drive revenue for the organization.
If all this sounds foreign to you, don’t fret! 365 Data Science offers a course called Customer Analytics in Python that will teach you to apply data science techniques in the field of marketing.
After taking this course, you will be able to perform tasks such as predicting user purchase behavior, completing the purchase cycle, and building customer segmentation models.
This is a great course for you to gain marketing domain knowledge and hone your data science skills.



Comments
Post a Comment